

Ivaylo Yordanov
Small But Mighty: The Surprising Benefits of Small Teams
Small but mighty teams can offer many benefits that are often overlooked in larger or...

It was quite natural on the old Google Universal Analytics to do reports… However inside the new GA4 Explore feature, we’ve got more options for reporting than ever. In this article we will dig deep into everything there is to know about it, how to use it and best practises.

In the previous version of Google Analytics – Universal Analytics, you had to go to Customization > Custom Reports and customize it there to make a custom report.
However, things have changed. Google announced that they are stopping supporting UA, and are starting to focus on GA4. You can learn more about it in one of our other articles here.
However, every marketer needs reports. Fortunately, in GA4 we have the option for custom ones, and we even have a lot of new stuff. Additionally, we can do as many in-depth reports as we want. In this article, we’ll describe all of the new GA4 Explorations UI (yes, they changed the name 🤷♂️)
Once we log into the GA4 property of our Analytics account, we will see basic data from our data streams. That’s enough for many people, but if we want to find answers to questions, then we need to get into the custom reports.
To do this, we need to go into our GA4 property and select “Explore” in the column on the left.
The page that will load contains a couple of things: redefined methods to do our reports and a history of the reports we’ve done. Presumably, you won’t have a history unless you’ve also tried doing something yourself before.
I find the easiest method to use is “Free form”. In this article, I’ll show you how to work with it, but you can experiment with the others. Find the one you find easiest to start with.
After selecting your method you will be shown a page where we see 3 main columns: Variables, Tab Settings, and the output data we get by configuring the previous 2 columns.
We’ll look at each of these individually so you can get a general idea of what’s what and what it’s for.
In this column, we have the “variables” that we can work with. Here we set up both the data period and the different types of segments, values, and indicators/metrics we will use later.
We’ll look at each of these individually to get a general idea of what’s what and what it’s for.
Important: If we want to use segments, metrics, and quantities that are not there, we need to add them from the plus signs after the corresponding component. We describe how to do this for each of them a little below.
What are GA4 report segments? Segments are an easy way to break down final information so you’re not just looking at aggregate numbers (for example: all orders placed, all page views, etc.).
Example segments (and those given by GA4 by default) are the traffic type. By traffic type, we can choose to be shown data ONLY from our paid Google ads. We can also filter out paid traffic and see only direct traffic, etc.
The power of segments is immense, through it we can get in-depth with our analytics and find easy solutions to complex problems that come up through the advertising process.
GA4 gives us the traffic type as a standard segment, but we can add more by using the plus sign next to the “Segments” text. From there, we can set up both typical segments and we can use Google’s enhanced artificial intelligence (if enough data is available) and show us users who are likely to purchase a product within 7 days, for example. In short: endless possibilities. Almost.
Dimensions in Google Analytics 4 are the data you want to track for a segment.
For example: we have a segment with paid traffic that has done an event. If we want to track the “years” and “interests” of this segment, we will add them to the dimensions and use them further.
The magnitudes we use are quite different. We can track information from Google Ads (for example campaign, ad account name, traffic source) and we can also track different things from demographics (interests, years), geolocation (city, region, country, coordinates), device (device language, device type, device brand), and so on.
Indicators/metrics are a set of numbers in Analytics that we can display in the report output.
For example: we want to see according to the paid traffic segment which country with the country value has the most sales made, which is the metric in this case.
The metrics are the final data we want to see in the final report by filtering them with the previous 2 variables: magnitudes and segments. Metrics can be both e-commerce events and regular events. We can also see data about the turnover of the online store we are managing. Also, so we can see different things about the user, like just the number of people who successfully bought from us just 1 time. Again, the possibilities are endless. Almost.
Once we choose the variables we will use, it’s time to use them, eventually. 😀
In the Tab Settings column, we can do a few basic things: change the report technique, change the visualization, select segments and compare them, put our values as a column or row, and use the metrics as the value we want in the final report.
The techniques we use are several: free form, funnel exploration, path exploration, segment overlap, cohort exploration, for the entire user period.
We can use each of them for a different purpose, so it’s important to be careful which one we choose, to learn about each of them in detail, you can see the Netpeak Journal article here.
The visualization of the report speaks for itself. From there, we can choose what view to have in our final report.
In the Tab Settings column we can do a few basic things: we can change the report technique, change the visualization, select segments and compare them, put our values as a column or row, and use the metrics as the value we want in the final report.
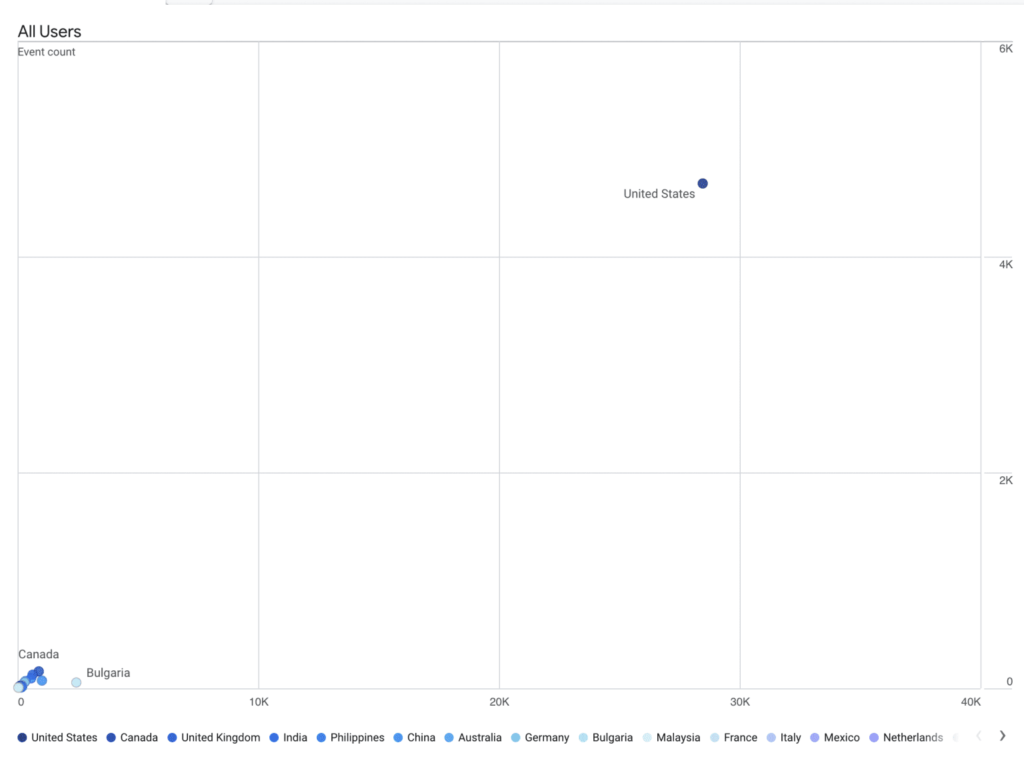
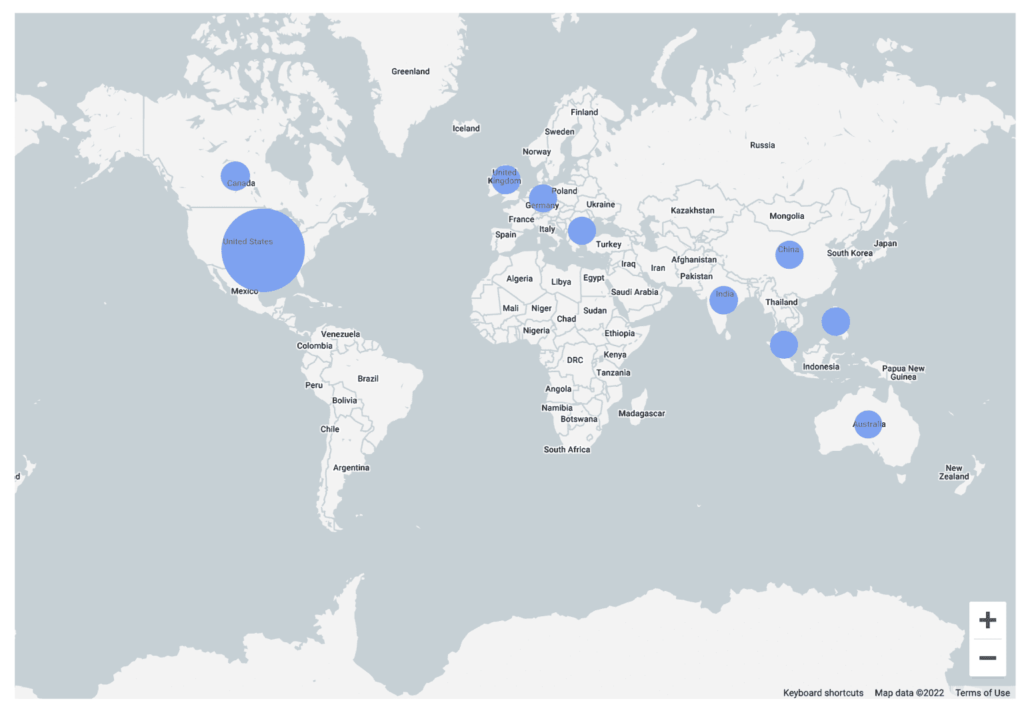
In the example below, it is set to show which of the countries in any traffic has the highest number of visits.


Important: Depending on what technique and report visualization we have chosen there may be differences in the interface as well as the options. The description below refers to “Free form”.
According to what segments we have imported in the last column, we can choose by what to filter the final information in the report. For example, if we have put in a “paid traffic” segment, that will be the thing that displays our information on the right.
We can compare segments and their information by putting 2 or more segments in one report. See the example below:
Important: Depending on what technique and report visualization we have chosen there may be differences in the interface as well as the options. The description below refers to “Free form”.
Again, as with the segments, we can use the selections from the last column that we have added and use them as we wish.
According to the different visualizations, we can put the values differently. For example: in the tabular visualization we can choose (if we want more than 1 quantity) which should be a column and which should be a row in the final report.
There is quite a big difference between the UA reports and those in GA4. However, we need to adapt quickly to offer our clients the best and latest.
In this article, we’ve done a rundown of the basics in GA4 Explorer that a marketer/manager needs to work with the reports. The good news is that once you get the hang of it, there’s nothing to be intimidated. There’s plenty of opportunity to dig deeper, which in turn provides more answers to complex questions that may come up from a client, or that you ask yourself.